
What Does Non-Watertight Mean in an STL File?
An STL model is made of triangles that describe its outer surface. For a solid intended for 3D printing, those triangles should generally meet to form an enclosed, consistently oriented shape. If there is a missing face or an exposed border, the surface may be non-watertight.
The triangle surface is closed, without exposed boundary edges. That is an important first check, but not a guarantee of a printable part.
Part of the surface may be missing or incorrectly connected, leaving a gap or a shape that is difficult to treat as a solid.
Watertight and manifold are related, but not identical. An ordinary closed solid typically has two faces meeting along each edge. A non-manifold edge may have three or more faces attached; a bad connection can also occur around a vertex. Even a mesh with no exposed edges may contain overlaps, intersections or other defects.
Some slicers can interpret imperfect meshes, but the result may differ from what the designer intended. It is safer to inspect the STL than to assume an apparently closed shape will print correctly.
Why Is an STL File Not Watertight?
3D scans, CAD exports, model editing and combining shapes can introduce missing faces or incorrect connections. These are the most useful warnings to recognize:
| Problem | What it means | What to try |
|---|---|---|
| Open edges | Border edges have a face on only one side. | Inspect the opening; fill a genuinely missing surface if appropriate. |
| Holes or missing faces | Part of the outer surface is absent. | Try automatic repair for simple gaps, or rebuild the area manually. |
| Non-manifold edges | Too many faces share an edge, or the mesh has an invalid connection. | Find duplicate or internal faces; repair the connections. |
| Incorrect face direction | Connected faces are not consistently oriented. | Recalculate normals and verify the result. |
| Duplicate or collapsed faces | Repeated triangles or triangles with almost no area. | Clean up duplicates and invalid triangles. |
| Overlapping surfaces | Different parts of the mesh pass through each other. | Review intersections in a mesh editor or CAD program. |
Be careful with the word hole: a hole you can see in the shape is not automatically a mesh defect. A correctly modeled screw hole can still be part of a fully closed solid. The problem is an unintended break in its surrounding surface.
How to Find Open Edges and Non-Manifold Errors
Before making changes, check where the STL has open edges or unusual connections. Look at those areas on the 3D model so you can decide what really needs repair.
- Open the STL Repair tool and choose your binary or ASCII .stl file. You can also open one of the sample models.
- Wait for the automatic checks. Review Surface closure check, Open edges, Possible openings, Non-manifold edges and face-direction warnings.
- If edge highlighting is available, select the category you want to inspect. Red shows open edges, purple non-manifold edges, and amber face-direction problems.
- Rotate the model to look at the affected area. Decide whether it is damage or an intended feature before selecting Fix STL.
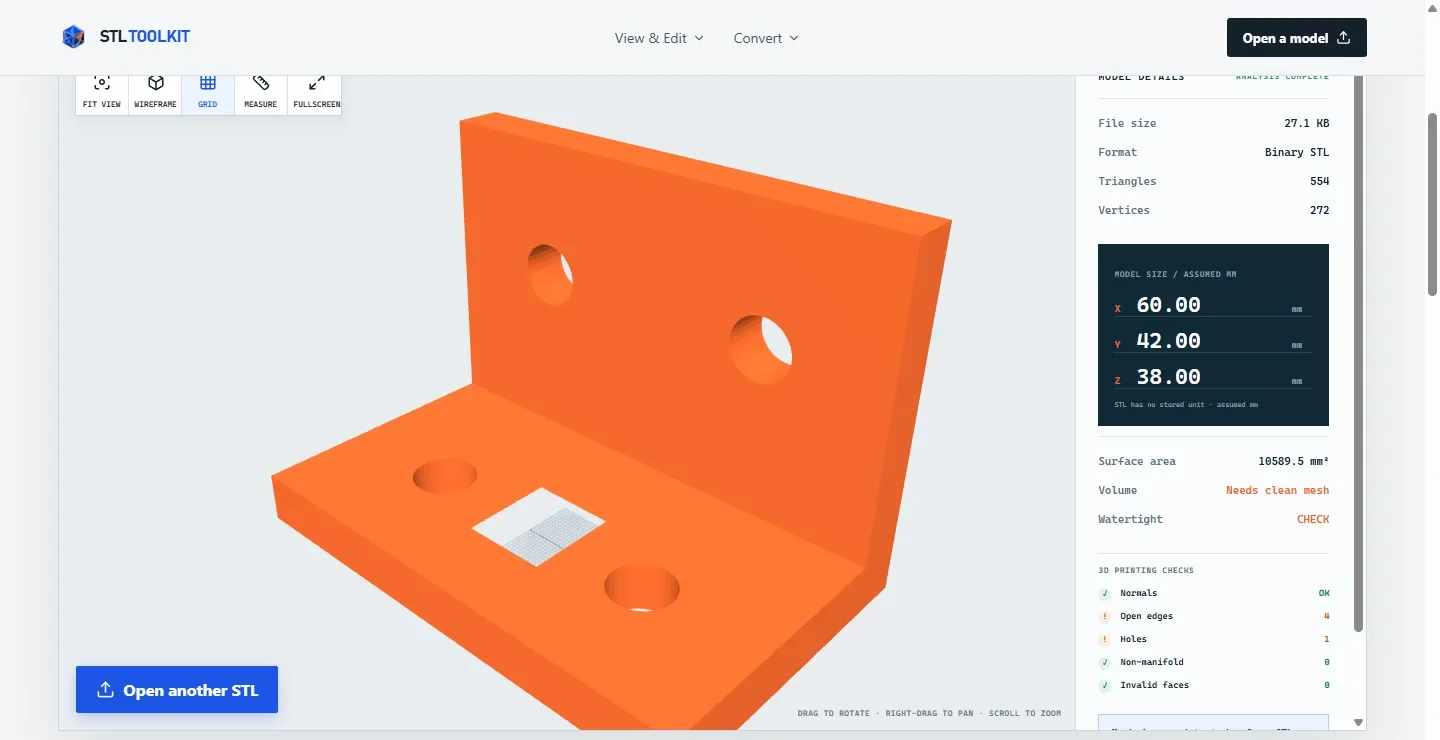
Possible openings shows groups of open edges, not a count of holes that can definitely be filled. For large files, you may still see the problem counts even when colored edge highlights are unavailable.
Check Whether a Hole Is Part of the Design
A mechanical bracket may need screw holes, a pipe may need an open passage, and a hollow part may have planned cavities. A well-modeled through-hole can be completely watertight because its inside walls connect to the outer surface. A missing cap, by contrast, may leave real exposed mesh edges.
Before filling an opening, ask whether that space must remain for a fastener, drainage or assembly. Compare the original shape with any automatically repaired version. If a repair closes a useful hole, keep the original and repair the surface manually instead.
Open the sample bracket and inspect its holes and passages. Some may be needed for assembly, so decide whether anything actually needs fixing before using automatic repair.
On the Repair page, select Try this STL under Bracket With Openings to load the example.
What to check in this bracket
- Rotate the original bracket and identify the openings needed for mounting or assembly.
- Look at the Open edges and Possible openings checks. A visible screw hole does not, by itself, prove that the STL is non-watertight.
- Try Fix STL, then switch between Original and After. Check that any required passages and holes are still present. If they disappear, keep the original.
Method 1: Fix a Non-Watertight STL Online for Free
STL Toolkit checks and processes the model locally in your browser. It can close some small, simple holes, join points along tiny gaps, remove duplicate or damaged faces, and correct some faces pointing the wrong way. Large curved holes and overlapping surfaces may need manual editing.
- Choose an STL. Open STL Repair Online and select a file or try the damaged sample.
- Review the initial checks. See which open edges, non-manifold edges or face-direction problems were detected.
- Select Fix STL. The tool tries to fix straightforward problems and may leave larger or complicated openings unchanged to avoid damaging the shape.
- Compare Original and After. Look at the 3D surfaces, problem highlights and the Before / After report. Cyan highlighting marks areas filled during repair when available.
- Check the result. Repair Successful means the problems covered by the checks were resolved. Partially Repaired means some remain. If you see No Improvement Found or Check Repair Changes, inspect the model before using it.
- Download and verify. Use the result only after inspecting the shape, rechecking the STL and reviewing its sliced layers.
Open the damaged sample, review the warnings, and try repairing it. You can then compare the original model with the result.
On the Repair page, choose Try this STL for STL With Mesh Problems.
See what changed after repair
- Before repairing, note the counts for Open edges, Non-manifold edges and Face direction problems. The problem counts for this sample will appear in the tool.
- Select Fix STL. Check the Before / After table to see which counts improved and which issues remain. If the tool filled an opening, inspect the cyan Filled areas highlight where available.
- Compare the size and shape. Download the result only if the parts and openings you need remain intact, then check it in your slicer.
Even if Surface closure check says Appears closed, inspect the model for thin walls, overlapping parts and other issues before printing.
How to Read an STL Repair Report
After selecting Fix STL, look at the result and compare the problem counts before and after. Then check the 3D model to make sure the repair kept the shape you need.
| Result | What it means | What to do next |
|---|---|---|
| No Issues Detected | No common problems were found by these checks in the original STL. | Confirm scale, details and sliced layers. Other printing problems may still exist. |
| Repair Successful | The checks no longer found the problems reported before repair. | Compare the surface and check the output in your slicer. |
| Partially Repaired | Some warnings improved, but others remain. | Inspect the remaining highlighted areas; consider manual editing. |
| No Improvement Found | The tool did not find an improvement in the reported problems. | Keep the original and try another repair approach. |
| Check Repair Changes | At least one checked problem got worse. | Do not assume the new file is better. Compare both shapes before using it. |
| Repair Failed | The repair could not be completed. | Try the original again or use Blender or another mesh editor. |
What should improve in the Before / After checks?
Fewer open edges generally means fewer exposed mesh borders. Fewer non-manifold edges can mean the surface connections are cleaner. But fewer warnings do not always mean a better model: filling an opening you need can also make the numbers look better. Always check the shape in 3D.
Compare the reported model dimensions and triangle counts. Volume change is only shown when both versions are suitable for comparison. If the model is open or cannot be measured reliably, you may see Not available. Check the dimensions and 3D shape instead.
Method 2: Fix a Non-Manifold STL in Blender
Blender is useful when a hole is too large or irregular for a safe automatic fix. Save a copy of the original STL first so you can undo an unwanted change to the shape.
- Import the STL. In Blender, use File → Import → STL to load the file (the menu can differ by version). Select the object and press Tab to enter Edit Mode.
- Find the bad edges. Switch to edge selection, then choose Select → Select All by Trait → Non Manifold. The selection helps you find openings or areas where faces are connected incorrectly.
- Merge close points carefully. Select relevant geometry, then use Mesh → Clean Up → Merge by Distance. Start with a small distance so you do not collapse fine features.
- Remove unwanted geometry. Inspect and delete duplicate or internal faces if they cause bad connections. Do not delete surfaces that are part of the intended object.
- Fill genuine missing faces. Select the boundary of a simple opening and use F to fill it. For a larger regular opening, try Grid Fill. Check that the new surface does not cross or block an intended passage.
- Correct face directions. Select the relevant faces, then press Shift + N to recalculate normals. Inspect the result; this does not repair holes by itself.
- Check again. Rerun the Non Manifold selection and inspect the model from all sides. Consider Blender's 3D Print Toolbox extension for print-oriented mesh checks. Installation and menu placement depend on your Blender version.
- Export an STL. Export the repaired mesh and open it in a slicer. Confirm scale and dimensions because STL files do not specify measurement units.
Choose the Blender fix based on the defect
| What you find | First operation to consider | Check before moving on |
|---|---|---|
| A small, clearly bounded missing face | Select only its boundary and use Fill (F). | Does the new face follow the surface you intended? |
| Two nearly touching edges | Try Merge by Distance on the affected points with a small threshold. | Did thin details or separate parts merge by mistake? |
| Inconsistent face direction | Use Shift + N on the affected faces. | Did the face direction change without damaging the geometry? |
| An overlapping internal surface | Inspect the intersection and remove unwanted internal faces or rebuild the joint. | Is the remaining surface connected as the intended solid? |
For additional checks, see the 3D Print Toolbox guide, including non-manifold and face-direction problems. Blender's mesh clean-up documentation explains Merge by Distance and Fill Holes. Do not apply Fill Holes to an entire model without checking which openings are intentional. If the geometry is deeply tangled or self-intersecting, it may be quicker to rebuild that area.
Method 3: Repair an STL with OrcaSlicer
If you use OrcaSlicer to prepare your prints, look for its Fix Model option. It can fix some gaps, repeated faces, faces pointing the wrong way and small overlapping areas. Complex problems may still need manual editing; menus vary by version.
- Open OrcaSlicer and import your STL in the Prepare view.
- Select or right-click the object in the 3D view or object list.
- Choose Fix Model, or use the warning icon next to the affected model if one appears.
- Read the result message and check whether the model still has warnings. If the repair failed, try another method.
- Inspect the model again, then switch to Preview and review the sliced layers, openings and wall paths before printing.
Some OrcaSlicer versions also offer Fix All for multiple models on a build plate. Check the OrcaSlicer Fix Model guide for your version. Always review the sliced layers after repairing.
Why Is My STL Still Not Watertight After Repair?
Filling a hole will not solve every STL problem. If the missing surface is large or complicated, automatic repair may not know what shape belongs there. Check the remaining warnings to choose your next step.
| What remains | Next step |
|---|---|
| Large, curved or irregular hole | Rebuild the missing surface in Blender or the source CAD model. |
| Many non-manifold edges | Look for interior faces, overlapping objects and disconnected pieces. |
| Overlapping or self-intersecting surfaces | Inspect how the solids meet; consider a proper union or manual mesh reconstruction. |
| Thin walls or tiny details | Adjust the original design and check it in the intended slicer; a closure check cannot measure print strength. |
| No improvement or new warnings | Compare the original and changed versions. Keep the original if the automatic result damages the design. |
| Wrong size after editing | Confirm the original inches/millimeters convention; adjust dimensions using STL Editor if needed. |
If you have the original CAD project, fix the problem there and export a new STL. This is often more reliable than repeatedly applying automatic repairs to a badly damaged model.
How to Verify a Repaired STL Before 3D Printing
Once a repair finishes, check the shape as well as the warning counts. A file that simply passes a few surface checks is not automatically print-ready.
- Review open edges. Are the remaining open edges intentional, or do they show a missing surface?
- Review non-manifold and face-direction warnings. Check whether they disappeared or whether some got worse.
- Compare Original and After. Inspect the filled areas, internal passages, mounting holes and fine details. Keep the original if the intended design changed.
- Check size. Compare the X/Y/Z dimensions. STL stores no inches or millimeters, so confirm units before resizing.
- Inspect the slicer preview. Check layer-by-layer for missing walls, unexpected filled openings, hollow areas, supports and overhangs.
Problems to look for in the slicer preview
Import the repaired STL into your slicer, choose your actual printer and settings, slice the model, then move through the layer preview from the bottom to the top. Check any mounting holes or internal channels at several different heights, not just the first layer.
| What you see in the sliced layers | What to do |
|---|---|
| A screw hole or passage becomes solid | Compare Original and After. The repair may have closed an intentional opening; return to the original or fix it manually. |
| A wall disappears at some heights | Check the wall thickness and model scale. A closed mesh may still be too thin for the chosen nozzle and settings. |
| Unexpected islands, gaps or extra internal paths | Check for overlapping parts, internal faces and self-intersections in the source mesh. |
| Size or orientation changes unexpectedly | Check the imported units and compare the model dimensions with the original STL. |
If you only need to examine the repaired model, use the STL Viewer. If the model still needs manual changes to size or orientation, the STL Editor provides those operations.
Frequently Asked Questions About Watertight STL Files
What does non-watertight mean in 3D printing?
A non-watertight STL has an opening or another problem in its surface that prevents it from forming a properly closed solid. Common signs include open edges, missing faces and non-manifold connections. Some slicers may still open the file, but you should check the sliced result.
How do I make an STL file watertight?
Check for open edges and missing faces, try repairing small, simple holes, then check the STL again. If large gaps or complex connections remain, use Blender or another mesh editor. Inspect the updated shape and sliced layers before printing.
Is watertight the same as manifold?
Not exactly. Watertight usually means there are no open surface boundaries; manifold describes how faces meet around edges and vertices. A mesh can have no open edges yet still contain invalid connections or intersecting surfaces. Even if the surface has no open edges, you still need to check the model in a slicer before printing.
Can Blender fix non-manifold STL edges?
Yes, in many cases. In Edit Mode you can select non-manifold elements, merge nearby duplicate vertices, remove unwanted internal faces, fill appropriate openings and recalculate normals. Complex geometry may require rebuilding part of the mesh.
Can I repair a non-watertight STL online for free?
Yes. STL Toolkit can check your STL in the browser and try to fix some small gaps, repeated or damaged faces and faces pointing the wrong way. Large or complicated openings may need manual repair, so compare both versions.
Why is my STL still not watertight after repair?
Some holes are too large or irregular for automatic repair. Overlapping surfaces and parts that do not connect properly can also cause problems. Check the remaining warnings and use a mesh editor if you need to rebuild the shape.
Does a watertight STL guarantee a successful 3D print?
No. You still need to check the size, wall thickness, overhangs, supports and sliced layers. A model can appear closed but still have problems that prevent a successful print.